Friday, May 27, 2016

CentOS 7: AD Authentication

In the past, I always installed pam_ldap and used that authentication method.  In Centos 7 and later, that just wasn't working.

Here's what I did to get user accounts to authenticate against Active Directory.

The RHEL guide for this is at:  https://access.redhat.com/documentation/en-US/Red_Hat_Enterprise_Linux/7/html/Windows_Integration_Guide/ch-Configuring_Authentication.html

Here's the definitions of what I'm writing:

example.com - Active Directory domain-name
EXAMPLE.COM - realm-name
server.example.com - Linux computer you're joining to the Active Directory domain


1.  Install realmd (probably already installed) ... if not, yum install realmd

2.  realm discover example.com

# realm discover example.com
example.com
  type: kerberos
  realm-name: EXAMPLE.COM
  domain-name: example.com
  configured: kerberos-member
  server-software: active-directory
  client-software: sssd
  required-package: oddjob
  required-package: oddjob-mkhomedir
  required-package: sssd
  required-package: adcli
  required-package: samba-common
  login-formats: %U
  login-policy: allow-realm-logins


3.  Get the exact realm-name from the command above

4.  realm join <realm-name> -U <domain admin>
     realm join EXAMPLE.COM -U domainadmin

5.  reboot the linux box

6.  login to the linux box ... as root at this point

7.  Look back at step 2.  In login-formats, %U is specific ... that means just the userid needs to be entered when logging into linux instead of DOMAIN\userid ... step 8 shows how to do that.

8.  To login as just the userid instead of DOMAIN\userid

vi /etc/sssd/sssd.conf
use_fully_qualified_names = False
systemctl restart sssd

9.  realm discover example.com   ... make sure login-formats = %U

# realm discover example.com
example.com
  type: kerberos
  realm-name: EXAMPLE.COM
  domain-name: example.com
  configured: kerberos-member
  server-software: active-directory
  client-software: sssd
  required-package: oddjob
  required-package: oddjob-mkhomedir
  required-package: sssd
  required-package: adcli
  required-package: samba-common
  login-formats: %U
  login-policy: allow-realm-logins

10.  id <active directory login> (this is an active directory user ... NOT linux) ... you should get back the Active Directory information on the user

11.  Make the users you want sudo capable

vi /etc/group
wheel:x:10:aduser1,aduser2,aduser3

12.  Now the annoying part ... you MUST specify who's allowed to login via the AD userid

To allow ALL users:  realm permit --all

To allow a specific user:  realm permit user@example.com

13.  Reboot

14.  Login via console or ssh with your ad user


Wednesday, February 10, 2016

Outbound caller ID on IP office

To give credit where credit is due, this article comes from the website http://blogs.scansource.com/avaya-ip-office-caller-id-primer/.  It worked perfectly for me.  Copying it here in case their website goes down.


Avaya IP Office Caller ID Primer


This article explains how to control outbound caller ID on IP Office.
1)   PRI
  1. Send out one DID for a group of phones
  2. Send out different DIDs for each user
2)   SIP
  1. Send out one DID for a group of phones
  2. Send out different DIDs for each user
3)   Analog trunks
1) PRICaller ID on a PRI can be controlled using the ARS table or Incoming Call Routes. In most scenarios, the ARS should be used to send out one number for a group of phones, and Incoming Call Routes should be used to send out different Caller ID for each user.
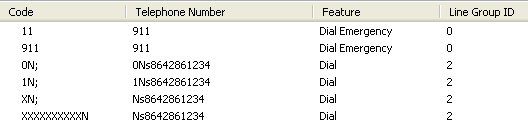
a.   Send out one DID for a group of phonesTo send out one number for all phones, or a group of phones, edit the ARS table as follows.
ARS:


Please note that some carriers require the additional “i” character, which tags the call as national. In those scenarios the Telephone Number field will look like “1Nsi8642861234”.
Short Code:
In scenarios where one group of phones needs to send out one DID, and another group of phones needs to send out a different DID, direct the users to the appropriate ARS table with user short codes. In the example below, when this user dials 9 and any other digits, they are directed to the Line Group ID specified. In this case, the user will be directed to the ARS table 53:PRI, and any caller ID rules configured in that ARS table will be applied to the call. These short codes are applied at the system-wide or user short code level.


b.   Send out different DIDs for each userTo send out each individual user’s DID, the best practice is to edit the Incoming Call Routes for each user.
Incoming Call Route:In the Incoming Number field, add the character “i” (note: lower case) as a prefix, followed by the full ten-digit DID. The user associated with that Incoming Call Route sends the information configured in the Incoming Number field as Caller ID when dialing out. Since the Incoming Number field is matched from right to left, adding all ten digits to the Incoming Number field does not affect inbound routing.


2) SIP Trunks
a.   Send out one DID for a group of phonesTo send out one number for all phones, or a group of phones, the best practice is to add a SIP URI with the full ten-digit DID number that you would like to use for Caller ID in the Local URI, Contact, and Display Name fields.


User Short Code:
Direct the users to the appropriate ARS table with user short codes. In the example below, when this user dials 9 and any other digits, they are directed to the Line Group ID specified. In this case, the user will be directed to the ARS table 52:SIP. These short codes are applied at the system-wide or user short code level.


ARS:
Point the ARS codes to the Line Group ID of the appropriate SIP URI. The caller ID information configured in the SIP URI will be used for all calls routed through this ARS table.


b.   Send out different DIDs for each user
Use Internal Data:


User’s SIP Tab:
With “Use Internal Data” configured in the SIP URI, Caller ID is controlled based on the information configured in each user’s SIP Tab. In the example below, this user sends out “8642861234” as their DID. The ARS table must be configured to use the correct Outgoing Group ID (1 in this case).


3) Analog Trunks
Analog Caller ID is tied to the physical line and cannot be changed at the IP Office level. The line provider is responsible for configuring which Caller ID is sent out.

Wednesday, April 16, 2014

SSL Certificates: Creating and Converting a PEM file to a P12 file in Linux

First, we'll create the PEM File:

  1. Open a new file called filename.pem
  2. Import your filename.key (key file)
  3. Import your filename.crt (main cert)
  4. Import your intermediate.crt (intermediate cert)
  5. Import your root.crt (root cert)
  6. Make sure there are no spaces between the various certs
Now, the PEM file is ready to use on any Linux box.


To convert the PEM file to a P12 file which can be used on Windows, use the following command:

openssl pkcs12 -export -inkey filename.key -in filename.pem -out filename.p12

NOTE:  You'll see all over the web where people tell you to use -certfile in the command.  That isn't necessary as long as your PEM file has the full certificate chain in it.

To use the .p12 file on Windows, move it to the Windows box and double click on the file ... that will install all the secondary certs into place.  Then, you'll need to do Start --> Run --> MMC and add the snap-in for certificates for the COMPUTER store.  Under the personal certificates, import the .p12 file.

You should be good from here on out.

Wednesday, September 26, 2012

Cisco 3750X/3750G stack upgrade

Here's the command to upgrade a Cisco Switch stack that is mixed with 3750X switches and 3750G switches:


switch#archive download-sw /allow-feature-upgrade /overwrite 
tftp://<address>/c3750e-universalk9-tar.122-55.SE.tar 
tftp://<address>/c3750-ipservicesk9-tar.122-55.SE.tar
 
 
The /allow-feature-upgrade allows you to bypass the new sanity check from 
Cisco if you're trying to change from ipbase to ipservices.
 
 
NOTE:  The universal IOS won't work on the 3750Gs 

Thursday, September 13, 2012

Get the Serial Number on a Cisco Callmanager

Login to the callmanager via ssh and run the following command to get the serial number of the Callmanager:

utils snmp walk 2c community127.0.0.1 .1.3.6.1.4.1.232.2.2.2.1.0

Make sure to replace community with the proper snmp community string

Friday, February 10, 2012

Linux: Resize root partition with LVM

The original writeup for this is at the following link:
 http://www.lavmug.org/wp-content/uploads/2010/04/Resize-root-partition-with-LVM.pdf


Extending “/” root partition in Linux VM with LVM
We will be extending the “/” partition from 17GB to ~27 GB – adding 10GB to “/”
The VM HD1 = 36 GB

*** Make sure you perform FULL backups of your system before doing this procedure ***


#1) Collect information about your current environment:
“df –h” --- Displays your current disk partition size:

[root@localhost lvmlog]# df -h
Filesystem Size Used Avail Use% Mounted on
/dev/mapper/VolGroup00-LogVol00 17G 2.5G 13G 17% /
/dev/mapper/VolGroup00-LogVol03 713M 162M 515M 24% /tmp
/dev/mapper/VolGroup00-LogVol02 2.0G 72M 1.8G 4% /var/log
/dev/sda1 99M 19M 76M 20% /boot
tmpfs 3.8G 0 3.8G 0% /dev/shm

“pvdisplay” --- Displays attributes of the physical LVM volume. Note PVSIZE and Free PE
(Phyical Extents)

[root@localhost lvmlog]# pvdisplay
/dev/hda: open failed: No medium found *** This is OK, itʼs just the CDROM. ***
--- Physical volume ---
PV Name /dev/sda2
VG Name VolGroup00
PV Size 35.90 GB / not usable 22.10 MB
Allocatable yes (but full)
PE Size (KByte) 32768
Total PE 1148
Free PE 0
Allocated PE 1148
PV UUID sS7pDq-F8b0-oaU3-noLN-7dIv-lWSz-njgEFE


“vgdisplay” --- Displays attributes of the LVM volume group.

--- Volume group ---
VG Name VolGroup00
System ID
Format lvm2
Metadata Areas 1
Metadata Sequence No 5
VG Access read/write
VG Status resizable
MAX LV 0
Cur LV 4
Open LV 4
Max PV 0
Cur PV 1
Act PV 1
VG Size 35.88 GB
PE Size 32.00 MB
Total PE 1148
Alloc PE / Size 1148 / 35.88 GB
Free PE / Size 0 / 0
VG UUID sajlPQ-4izJ-PDh4-OqSg-mdh6-Iz4c-wZSUrQ

“lvdisplay” --- Displays attributes of the LVM volume group. Weʼll just look at the lv we want to
expand.

--- Logical volume ---
LV Name /dev/VolGroup00/LogVol00
VG Name VolGroup00
LV UUID VOK07i-dqHt-7qK4-42zB-RT85-P89B-CXEMaI
LV Write Access read/write
LV Status available
# ope 1
LV Size 16.59 GB ----- This is the “root” partition that weʼll expand.
Current LE 531
Segments 1
Allocation inherit
Read ahead sectors auto
- currently set to 256
Block device 253:0


#2) Cleanly Shutdown the Linux VM guest and resize Hard Disk 1:
Itʼs a good idea to remove any snapshots before doing this procedure. You should extend the
VMʼs Hard disk by using the VIC gui (under Edit Settings) OR use the service consoleʼs
VMKFSTOOLS command cli. --- Power the VM guest back on and login.


#3) Use “fdisk” to create a new partition on sda. You will be adding this
partition to your existing volume, providing additional space.

[root@localhost lvmlog]# fdisk /dev/sda

The number of cylinders for this disk is set to 6004.
There is nothing wrong with that, but this is larger than 1024, and could in certain setups cause
problems with:
1) software that runs at boot time (e.g., old versions of LILO)
2) booting and partitioning software from other OSʼs (e.g., DOS FDISK, OS/2 FDISK)

Command (m for help): p
Disk /dev/sda: 49.3 GB, 49392123904 bytes ---- HERE, you will see a larger physical disk.
255 heads, 63 sectors/track, 6004 cylinders
Units = cylinders of 16065 * 512 = 8225280 bytes

Device Boot Start End Blocks Id System
/dev/sda1 * 1 13 104391 83 Linux
/dev/sda2 14 4699 37640295 8e Linux LVM

Command (m for help): n
Command action
    e extended
    p primary partition (1-4) p
Partition number (1-4): 3
First cylinder (4700-6004, default 4700): *** Take the defaults here. You want all of the partition.
Using default value 4700
Last cylinder or +size or +sizeM or +sizeK (4700-6004, default 6004):
Using default value 6004

Command (m for help): p


Disk /dev/sda: 49.3 GB, 49392123904 bytes
255 heads, 63 sectors/track, 6004 cylinders
Units = cylinders of 16065 * 512 = 8225280 bytes
Device Boot Start End Blocks Id System
/dev/sda1 * 1 13 104391 83 Linux
/dev/sda2 14 4699 37640295 8e Linux LVM
/dev/sda3 4700 6004 10482412+ 83 Linux
Command (m for help): t
Partition number (1-4): 3
Hex code (type L to list codes): 8e
Changed system type of partition 3 to 8e (Linux LVM)
Command (m for help): p

Disk /dev/sda: 49.3 GB, 49392123904 bytes
255 heads, 63 sectors/track, 6004 cylinders
Units = cylinders of 16065 * 512 = 8225280 bytes

Device Boot Start End Blocks Id System
/dev/sda1 * 1 13 104391 83 Linux
/dev/sda2 14 4699 37640295 8e Linux LVM
/dev/sda3 4700 6004 10482412+ 8e Linux LVM
Command (m for help): w
The partition table has been altered!
Calling ioctl() to re-read partition table.
WARNING: Re-reading the partition table failed with error 16: Device or resource busy.
The kernel still uses the old table.
The new table will be used at the next reboot.Syncing disks.


#4) Verify your additional, new partition:
[root@localhost lvmlog]# fdisk –l

Disk /dev/sda: 49.3 GB, 49392123904 bytes
255 heads, 63 sectors/track, 6004 cylinders
Units = cylinders of 16065 * 512 = 8225280 bytes
Device Boot Start End Blocks Id System
/dev/sda1 * 1 13 104391 83 Linux
/dev/sda2 14 4699 37640295 8e Linux LVM
/dev/sda3 4700 6004 10482412+ 8e Linux LVM


#5) Add the new disk device (/dev/sda3) to the LVM configuration: *Note:
You many need to reboot the Linux guest.

[root@localhost lvmlog]# pvcreate /dev/sda3
Device /dev/sda3 not found (or ignored by filtering). *** NEED TO REBOOT
root@localhost lvmlog]# reboot

[root@localhost lvmlog]# pvcreate /dev/sda3
Physical volume "/dev/sda3" successfully created


root@localhost lvmlog]# pvdisplay

--- Physical volume ---
PV Name /dev/sda2
VG Name VolGroup00
PV Size 35.90 GB / not usable 22.10 MB
Allocatable yes (but full)
PE Size (KByte) 32768
Total PE 1148
Free PE 0
Allocated PE 1148
PV UUID sS7pDq-F8b0-oaU3-noLN-7dIv-lWSz-njgEFE


"/dev/sda3" is a new physical volume of "10.00 GB"

--- NEW Physical volume ---
PV Name /dev/sda3
VG Name
PV Size 10.00 GB
Allocatable NO
PE Size (KByte) 0
Total PE 0
Free PE 0
Allocated PE 0
PV UUID RJ7vN1-d59J-d2a0-0Zb0-H6fB-Rzd1-sAe2vZ


#6) Extend the existing Volume Group:

[root@localhost lvmlog]# vgdisplay (Letʼs verify the VG Size and Free PE / Size before we start.

--- Volume group ---
VG Name VolGroup00
System ID
Format lvm2
Metadata Areas 1
Metadata Sequence No 5
VG Access read/write
VG Status resizable
MAX LV 0
Cur LV 4
Open LV 4
Max PV 0
Cur PV 1
Act PV 1
VG Size 35.88 GB
PE Size 32.00 MB
Total PE 1148
Alloc PE / Size 1148 / 35.88 GB
Free PE / Size 0 / 0
VG UUID sajlPQ-4izJ-PDh4-OqSg-mdh6-Iz4c-wZSUrQ

[root@localhost lvmlog]# vgextend VolGroup00 /dev/sda3
Volume group "VolGroup00" successfully extended

[root@localhost lvmlog]# vgdisplay (Note: We now have additional Free space)

--- Volume group ---
VG Name VolGroup00
System ID
Format lvm2
Metadata Areas 2
Metadata Sequence No 6
VG Access read/write
VG Status resizable
MAX LV 0
Cur LV 4
Open LV 4
Max PV 0
Cur PV 2
Act PV 2
VG Size 45.84 GB
PE Size 32.00 MB
Total PE 1467
Alloc PE / Size 1148 / 35.88 GB
Free PE / Size 319 / 9.97 GB
VG UUID sajlPQ-4izJ-PDh4-OqSg-mdh6-Iz4c-wZSUrQ


#7) Extend the logical volume that contains “/”:

[root@localhost lvmlog]# lvdisplay (Letʼs just look at LogVol00 – the root vol)

--- Logical volume ---
LV Name /dev/VolGroup00/LogVol00
VG Name VolGroup00
LV UUID VOK07i-dqHt-7qK4-42zB-RT85-P89B-CXEMaI
LV Write Access read/write
LV Status available
# open 1
LV Size 16.59 GB
Current LE 531
Segments 1
Allocation inherit
Read ahead sectors auto
- currently set to 256
Block device 253:0

[root@localhost lvmlog]# lvextend -l +319 /dev/VolGroup00/LogVol00 /dev/sda3
Extending logical volume LogVol00 to 26.56 GB
Logical volume LogVol00 successfully resized

[root@localhost lvmlog]# lvdisplay (Letʼs just look at LogVol00 – the root vol)

--- Logical volume ---
LV Name /dev/VolGroup00/LogVol00
VG Name VolGroup00
LV UUID VOK07i-dqHt-7qK4-42zB-RT85-P89B-CXEMaI
LV Write Access read/write
LV Status available
# open 1
LV Size 26.56 GB *** Notice the new space.
Current LE 850
Segments 2
Allocation inherit
Read ahead sectors auto
- currently set to 256
Block device 253:0


#8) Resize the “/” root partition:

[root@localhost lvmlog]# df –h (Letʼs take a look at the FS before resize. Note “/” size)
Filesystem Size Used Avail Use% Mounted on
/dev/mapper/VolGroup00-LogVol00 17G 2.5G 13G 17% /
/dev/mapper/VolGroup00-LogVol03 713M 162M 515M 24% /tmp
/dev/mapper/VolGroup00-LogVol02 2.0G 72M 1.8G 4% /var/log
/dev/sda1 99M 19M 76M 20% /boot
tmpfs 3.8G 0 3.8G 0% /dev/shm

[root@localhost lvmlog]# resize2fs /dev/VolGroup00/LogVol00
resize2fs 1.39 (29-May-2006)
Filesystem at /dev/VolGroup00/LogVol00 is mounted on /; on-line resizing required
Performing an on-line resize of /dev/VolGroup00/LogVol00 to 6963200 (4k) blocks.
The filesystem on /dev/VolGroup00/LogVol00 is now 6963200 blocks long.

[root@localhost lvmlog]# df –h (Letʼs take a look at the new size of “/”)
Filesystem Size Used Avail Use% Mounted on
/dev/mapper/VolGroup00-LogVol00 26G 2.5G 22G 11% /
/dev/mapper/VolGroup00-LogVol03 713M 162M 515M 24% /tmp
/dev/mapper/VolGroup00-LogVol02 2.0G 72M 1.8G 4% /var/log
/dev/sda1 99M 19M 76M 20% /boot
tmpfs 3.8G 0 3.8G 0% /dev/shm
Thatʼs it… Itʼs always a good idea to reboot your VM after this procedure just
to make sure all is well.

Openfire memory issues

Original text from:  http://niktips.wordpress.com/2011/10/24/out-of-memory-issues-in-openfire/


Out of memory issues in Openfire

We are constantly getting following errors in Openfire 3.6.4 installation:
java.lang.OutOfMemoryError: GC overhead limit exceeded
java.lang.OutOfMemoryError: Java heap space
It turns out that it’s a common error for 3.6.4.  Read this announcement Suffering from memory-related issues in Openfire? Read this! and this forum thread Openfire 3.6.4 memory leak with Empathy.
This error is related to memory leak in PEP which implements extended statuses. Since we don’t use them we just switched PEP off. Go to your Openfire admin console, select Server->Server Manager->System Properties at the bottom add property xmpp.pep.enabled value false. Restart server.