Showing posts with label System Administration. Show all posts

Wednesday, November 16, 2016

CentOS 7: Moving Active Directory Domains

This goes hand-in-hand with this article:  http://www.mims.me/2016/05/centos-7-ad-authentication.html

1  First, we need to leave the first domain

realm leave -v EXAMPLE.COM

or

realm leave -v EXAMPLE.COM -U <domain admin account>


2.  Next, we need to join the new domain

realm join -v EXAMPLE.COM -U <domain admin account>


3.  If this worked, then go to the article mentioned at the top of the article to set various settings.


4.  I had a lot of trouble with various errors when trying to join my new domain, so here are some places to look if you have trouble.


/etc/samba/smb.conf  ... see if there are ANY references to the OLD domain or OLD DNS servers in this file and modify them to the NEW domain and NEW DNS servers.

If the below doesn't exist, don't add, but in my case it did, so make sure to modify.


[global]
#--authconfig--start-line--

# Generated by authconfig on 2015/08/04 13:08:52
# DO NOT EDIT THIS SECTION (delimited by --start-line--/--end-line--)
# Any modification may be deleted or altered by authconfig in future

   password server = ADDC1 ADDC2, ADDC3
security = user
   idmap config * : range = 16777216-33554431
   template shell = /bin/bash
   winbind use default domain = false
   winbind offline logon = false

#--authconfig--end-line--


___________________________________________________

/etc/krb5.conf  ... see if there are ANY references to the OLD domain and OLD DNS servers in this file and modify them to the NEW domain and NEW DNS servers

___________________________________________________

If it still doesn't work, run authconfig-tui and use the settings below (obviously modified for your domain):


5.  All you're looking for is that the computer successfully joined the domain.

Wednesday, February 10, 2016

Outbound caller ID on IP office

To give credit where credit is due, this article comes from the website http://blogs.scansource.com/avaya-ip-office-caller-id-primer/.  It worked perfectly for me.  Copying it here in case their website goes down.


Avaya IP Office Caller ID Primer


This article explains how to control outbound caller ID on IP Office.
1)   PRI
  1. Send out one DID for a group of phones
  2. Send out different DIDs for each user
2)   SIP
  1. Send out one DID for a group of phones
  2. Send out different DIDs for each user
3)   Analog trunks
1) PRICaller ID on a PRI can be controlled using the ARS table or Incoming Call Routes. In most scenarios, the ARS should be used to send out one number for a group of phones, and Incoming Call Routes should be used to send out different Caller ID for each user.
a.   Send out one DID for a group of phonesTo send out one number for all phones, or a group of phones, edit the ARS table as follows.
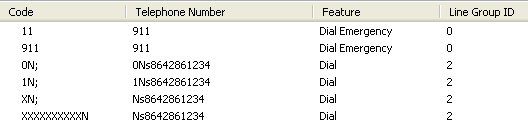
ARS:


Please note that some carriers require the additional “i” character, which tags the call as national. In those scenarios the Telephone Number field will look like “1Nsi8642861234”.
Short Code:
In scenarios where one group of phones needs to send out one DID, and another group of phones needs to send out a different DID, direct the users to the appropriate ARS table with user short codes. In the example below, when this user dials 9 and any other digits, they are directed to the Line Group ID specified. In this case, the user will be directed to the ARS table 53:PRI, and any caller ID rules configured in that ARS table will be applied to the call. These short codes are applied at the system-wide or user short code level.


b.   Send out different DIDs for each userTo send out each individual user’s DID, the best practice is to edit the Incoming Call Routes for each user.
Incoming Call Route:In the Incoming Number field, add the character “i” (note: lower case) as a prefix, followed by the full ten-digit DID. The user associated with that Incoming Call Route sends the information configured in the Incoming Number field as Caller ID when dialing out. Since the Incoming Number field is matched from right to left, adding all ten digits to the Incoming Number field does not affect inbound routing.


2) SIP Trunks
a.   Send out one DID for a group of phonesTo send out one number for all phones, or a group of phones, the best practice is to add a SIP URI with the full ten-digit DID number that you would like to use for Caller ID in the Local URI, Contact, and Display Name fields.


User Short Code:
Direct the users to the appropriate ARS table with user short codes. In the example below, when this user dials 9 and any other digits, they are directed to the Line Group ID specified. In this case, the user will be directed to the ARS table 52:SIP. These short codes are applied at the system-wide or user short code level.


ARS:
Point the ARS codes to the Line Group ID of the appropriate SIP URI. The caller ID information configured in the SIP URI will be used for all calls routed through this ARS table.


b.   Send out different DIDs for each user
Use Internal Data:


User’s SIP Tab:
With “Use Internal Data” configured in the SIP URI, Caller ID is controlled based on the information configured in each user’s SIP Tab. In the example below, this user sends out “8642861234” as their DID. The ARS table must be configured to use the correct Outgoing Group ID (1 in this case).


3) Analog Trunks
Analog Caller ID is tied to the physical line and cannot be changed at the IP Office level. The line provider is responsible for configuring which Caller ID is sent out.

Wednesday, April 16, 2014

SSL Certificates: Creating and Converting a PEM file to a P12 file in Linux

First, we'll create the PEM File:

  1. Open a new file called filename.pem
  2. Import your filename.key (key file)
  3. Import your filename.crt (main cert)
  4. Import your intermediate.crt (intermediate cert)
  5. Import your root.crt (root cert)
  6. Make sure there are no spaces between the various certs
Now, the PEM file is ready to use on any Linux box.


To convert the PEM file to a P12 file which can be used on Windows, use the following command:

openssl pkcs12 -export -inkey filename.key -in filename.pem -out filename.p12

NOTE:  You'll see all over the web where people tell you to use -certfile in the command.  That isn't necessary as long as your PEM file has the full certificate chain in it.

To use the .p12 file on Windows, move it to the Windows box and double click on the file ... that will install all the secondary certs into place.  Then, you'll need to do Start --> Run --> MMC and add the snap-in for certificates for the COMPUTER store.  Under the personal certificates, import the .p12 file.

You should be good from here on out.

Wednesday, September 26, 2012

Cisco 3750X/3750G stack upgrade

Here's the command to upgrade a Cisco Switch stack that is mixed with 3750X switches and 3750G switches:


switch#archive download-sw /allow-feature-upgrade /overwrite 
tftp://<address>/c3750e-universalk9-tar.122-55.SE.tar 
tftp://<address>/c3750-ipservicesk9-tar.122-55.SE.tar
 
 
The /allow-feature-upgrade allows you to bypass the new sanity check from 
Cisco if you're trying to change from ipbase to ipservices.
 
 
NOTE:  The universal IOS won't work on the 3750Gs 

Thursday, September 13, 2012

Get the Serial Number on a Cisco Callmanager

Login to the callmanager via ssh and run the following command to get the serial number of the Callmanager:

utils snmp walk 2c community127.0.0.1 .1.3.6.1.4.1.232.2.2.2.1.0

Make sure to replace community with the proper snmp community string

Friday, February 10, 2012

Linux: Resize root partition with LVM

The original writeup for this is at the following link:
 http://www.lavmug.org/wp-content/uploads/2010/04/Resize-root-partition-with-LVM.pdf


Extending “/” root partition in Linux VM with LVM
We will be extending the “/” partition from 17GB to ~27 GB – adding 10GB to “/”
The VM HD1 = 36 GB

*** Make sure you perform FULL backups of your system before doing this procedure ***


#1) Collect information about your current environment:
“df –h” --- Displays your current disk partition size:

[root@localhost lvmlog]# df -h
Filesystem Size Used Avail Use% Mounted on
/dev/mapper/VolGroup00-LogVol00 17G 2.5G 13G 17% /
/dev/mapper/VolGroup00-LogVol03 713M 162M 515M 24% /tmp
/dev/mapper/VolGroup00-LogVol02 2.0G 72M 1.8G 4% /var/log
/dev/sda1 99M 19M 76M 20% /boot
tmpfs 3.8G 0 3.8G 0% /dev/shm

“pvdisplay” --- Displays attributes of the physical LVM volume. Note PVSIZE and Free PE
(Phyical Extents)

[root@localhost lvmlog]# pvdisplay
/dev/hda: open failed: No medium found *** This is OK, itʼs just the CDROM. ***
--- Physical volume ---
PV Name /dev/sda2
VG Name VolGroup00
PV Size 35.90 GB / not usable 22.10 MB
Allocatable yes (but full)
PE Size (KByte) 32768
Total PE 1148
Free PE 0
Allocated PE 1148
PV UUID sS7pDq-F8b0-oaU3-noLN-7dIv-lWSz-njgEFE


“vgdisplay” --- Displays attributes of the LVM volume group.

--- Volume group ---
VG Name VolGroup00
System ID
Format lvm2
Metadata Areas 1
Metadata Sequence No 5
VG Access read/write
VG Status resizable
MAX LV 0
Cur LV 4
Open LV 4
Max PV 0
Cur PV 1
Act PV 1
VG Size 35.88 GB
PE Size 32.00 MB
Total PE 1148
Alloc PE / Size 1148 / 35.88 GB
Free PE / Size 0 / 0
VG UUID sajlPQ-4izJ-PDh4-OqSg-mdh6-Iz4c-wZSUrQ

“lvdisplay” --- Displays attributes of the LVM volume group. Weʼll just look at the lv we want to
expand.

--- Logical volume ---
LV Name /dev/VolGroup00/LogVol00
VG Name VolGroup00
LV UUID VOK07i-dqHt-7qK4-42zB-RT85-P89B-CXEMaI
LV Write Access read/write
LV Status available
# ope 1
LV Size 16.59 GB ----- This is the “root” partition that weʼll expand.
Current LE 531
Segments 1
Allocation inherit
Read ahead sectors auto
- currently set to 256
Block device 253:0


#2) Cleanly Shutdown the Linux VM guest and resize Hard Disk 1:
Itʼs a good idea to remove any snapshots before doing this procedure. You should extend the
VMʼs Hard disk by using the VIC gui (under Edit Settings) OR use the service consoleʼs
VMKFSTOOLS command cli. --- Power the VM guest back on and login.


#3) Use “fdisk” to create a new partition on sda. You will be adding this
partition to your existing volume, providing additional space.

[root@localhost lvmlog]# fdisk /dev/sda

The number of cylinders for this disk is set to 6004.
There is nothing wrong with that, but this is larger than 1024, and could in certain setups cause
problems with:
1) software that runs at boot time (e.g., old versions of LILO)
2) booting and partitioning software from other OSʼs (e.g., DOS FDISK, OS/2 FDISK)

Command (m for help): p
Disk /dev/sda: 49.3 GB, 49392123904 bytes ---- HERE, you will see a larger physical disk.
255 heads, 63 sectors/track, 6004 cylinders
Units = cylinders of 16065 * 512 = 8225280 bytes

Device Boot Start End Blocks Id System
/dev/sda1 * 1 13 104391 83 Linux
/dev/sda2 14 4699 37640295 8e Linux LVM

Command (m for help): n
Command action
    e extended
    p primary partition (1-4) p
Partition number (1-4): 3
First cylinder (4700-6004, default 4700): *** Take the defaults here. You want all of the partition.
Using default value 4700
Last cylinder or +size or +sizeM or +sizeK (4700-6004, default 6004):
Using default value 6004

Command (m for help): p


Disk /dev/sda: 49.3 GB, 49392123904 bytes
255 heads, 63 sectors/track, 6004 cylinders
Units = cylinders of 16065 * 512 = 8225280 bytes
Device Boot Start End Blocks Id System
/dev/sda1 * 1 13 104391 83 Linux
/dev/sda2 14 4699 37640295 8e Linux LVM
/dev/sda3 4700 6004 10482412+ 83 Linux
Command (m for help): t
Partition number (1-4): 3
Hex code (type L to list codes): 8e
Changed system type of partition 3 to 8e (Linux LVM)
Command (m for help): p

Disk /dev/sda: 49.3 GB, 49392123904 bytes
255 heads, 63 sectors/track, 6004 cylinders
Units = cylinders of 16065 * 512 = 8225280 bytes

Device Boot Start End Blocks Id System
/dev/sda1 * 1 13 104391 83 Linux
/dev/sda2 14 4699 37640295 8e Linux LVM
/dev/sda3 4700 6004 10482412+ 8e Linux LVM
Command (m for help): w
The partition table has been altered!
Calling ioctl() to re-read partition table.
WARNING: Re-reading the partition table failed with error 16: Device or resource busy.
The kernel still uses the old table.
The new table will be used at the next reboot.Syncing disks.


#4) Verify your additional, new partition:
[root@localhost lvmlog]# fdisk –l

Disk /dev/sda: 49.3 GB, 49392123904 bytes
255 heads, 63 sectors/track, 6004 cylinders
Units = cylinders of 16065 * 512 = 8225280 bytes
Device Boot Start End Blocks Id System
/dev/sda1 * 1 13 104391 83 Linux
/dev/sda2 14 4699 37640295 8e Linux LVM
/dev/sda3 4700 6004 10482412+ 8e Linux LVM


#5) Add the new disk device (/dev/sda3) to the LVM configuration: *Note:
You many need to reboot the Linux guest.

[root@localhost lvmlog]# pvcreate /dev/sda3
Device /dev/sda3 not found (or ignored by filtering). *** NEED TO REBOOT
root@localhost lvmlog]# reboot

[root@localhost lvmlog]# pvcreate /dev/sda3
Physical volume "/dev/sda3" successfully created


root@localhost lvmlog]# pvdisplay

--- Physical volume ---
PV Name /dev/sda2
VG Name VolGroup00
PV Size 35.90 GB / not usable 22.10 MB
Allocatable yes (but full)
PE Size (KByte) 32768
Total PE 1148
Free PE 0
Allocated PE 1148
PV UUID sS7pDq-F8b0-oaU3-noLN-7dIv-lWSz-njgEFE


"/dev/sda3" is a new physical volume of "10.00 GB"

--- NEW Physical volume ---
PV Name /dev/sda3
VG Name
PV Size 10.00 GB
Allocatable NO
PE Size (KByte) 0
Total PE 0
Free PE 0
Allocated PE 0
PV UUID RJ7vN1-d59J-d2a0-0Zb0-H6fB-Rzd1-sAe2vZ


#6) Extend the existing Volume Group:

[root@localhost lvmlog]# vgdisplay (Letʼs verify the VG Size and Free PE / Size before we start.

--- Volume group ---
VG Name VolGroup00
System ID
Format lvm2
Metadata Areas 1
Metadata Sequence No 5
VG Access read/write
VG Status resizable
MAX LV 0
Cur LV 4
Open LV 4
Max PV 0
Cur PV 1
Act PV 1
VG Size 35.88 GB
PE Size 32.00 MB
Total PE 1148
Alloc PE / Size 1148 / 35.88 GB
Free PE / Size 0 / 0
VG UUID sajlPQ-4izJ-PDh4-OqSg-mdh6-Iz4c-wZSUrQ

[root@localhost lvmlog]# vgextend VolGroup00 /dev/sda3
Volume group "VolGroup00" successfully extended

[root@localhost lvmlog]# vgdisplay (Note: We now have additional Free space)

--- Volume group ---
VG Name VolGroup00
System ID
Format lvm2
Metadata Areas 2
Metadata Sequence No 6
VG Access read/write
VG Status resizable
MAX LV 0
Cur LV 4
Open LV 4
Max PV 0
Cur PV 2
Act PV 2
VG Size 45.84 GB
PE Size 32.00 MB
Total PE 1467
Alloc PE / Size 1148 / 35.88 GB
Free PE / Size 319 / 9.97 GB
VG UUID sajlPQ-4izJ-PDh4-OqSg-mdh6-Iz4c-wZSUrQ


#7) Extend the logical volume that contains “/”:

[root@localhost lvmlog]# lvdisplay (Letʼs just look at LogVol00 – the root vol)

--- Logical volume ---
LV Name /dev/VolGroup00/LogVol00
VG Name VolGroup00
LV UUID VOK07i-dqHt-7qK4-42zB-RT85-P89B-CXEMaI
LV Write Access read/write
LV Status available
# open 1
LV Size 16.59 GB
Current LE 531
Segments 1
Allocation inherit
Read ahead sectors auto
- currently set to 256
Block device 253:0

[root@localhost lvmlog]# lvextend -l +319 /dev/VolGroup00/LogVol00 /dev/sda3
Extending logical volume LogVol00 to 26.56 GB
Logical volume LogVol00 successfully resized

[root@localhost lvmlog]# lvdisplay (Letʼs just look at LogVol00 – the root vol)

--- Logical volume ---
LV Name /dev/VolGroup00/LogVol00
VG Name VolGroup00
LV UUID VOK07i-dqHt-7qK4-42zB-RT85-P89B-CXEMaI
LV Write Access read/write
LV Status available
# open 1
LV Size 26.56 GB *** Notice the new space.
Current LE 850
Segments 2
Allocation inherit
Read ahead sectors auto
- currently set to 256
Block device 253:0


#8) Resize the “/” root partition:

[root@localhost lvmlog]# df –h (Letʼs take a look at the FS before resize. Note “/” size)
Filesystem Size Used Avail Use% Mounted on
/dev/mapper/VolGroup00-LogVol00 17G 2.5G 13G 17% /
/dev/mapper/VolGroup00-LogVol03 713M 162M 515M 24% /tmp
/dev/mapper/VolGroup00-LogVol02 2.0G 72M 1.8G 4% /var/log
/dev/sda1 99M 19M 76M 20% /boot
tmpfs 3.8G 0 3.8G 0% /dev/shm

[root@localhost lvmlog]# resize2fs /dev/VolGroup00/LogVol00
resize2fs 1.39 (29-May-2006)
Filesystem at /dev/VolGroup00/LogVol00 is mounted on /; on-line resizing required
Performing an on-line resize of /dev/VolGroup00/LogVol00 to 6963200 (4k) blocks.
The filesystem on /dev/VolGroup00/LogVol00 is now 6963200 blocks long.

[root@localhost lvmlog]# df –h (Letʼs take a look at the new size of “/”)
Filesystem Size Used Avail Use% Mounted on
/dev/mapper/VolGroup00-LogVol00 26G 2.5G 22G 11% /
/dev/mapper/VolGroup00-LogVol03 713M 162M 515M 24% /tmp
/dev/mapper/VolGroup00-LogVol02 2.0G 72M 1.8G 4% /var/log
/dev/sda1 99M 19M 76M 20% /boot
tmpfs 3.8G 0 3.8G 0% /dev/shm
Thatʼs it… Itʼs always a good idea to reboot your VM after this procedure just
to make sure all is well.

Openfire memory issues

Original text from:  http://niktips.wordpress.com/2011/10/24/out-of-memory-issues-in-openfire/


Out of memory issues in Openfire

We are constantly getting following errors in Openfire 3.6.4 installation:
java.lang.OutOfMemoryError: GC overhead limit exceeded
java.lang.OutOfMemoryError: Java heap space
It turns out that it’s a common error for 3.6.4.  Read this announcement Suffering from memory-related issues in Openfire? Read this! and this forum thread Openfire 3.6.4 memory leak with Empathy.
This error is related to memory leak in PEP which implements extended statuses. Since we don’t use them we just switched PEP off. Go to your Openfire admin console, select Server->Server Manager->System Properties at the bottom add property xmpp.pep.enabled value false. Restart server.

Monday, September 26, 2011

MySQL Add Users to Database

#
# Connect to the local database server as user root
# You will be prompted for a password.
#
mysql -h localhost -u root -p

#
# Now we see the 'mysql>' prompt and we can run
# the following to create a new database called dummydb.
#
mysql> create database dummydb;
Query OK, 1 row affected (0.00 sec)

#
# Now we create the user dummyuser and give him full
# permissions on the new database
mysql> grant CREATE,INSERT,DELETE,UPDATE,SELECT on dummydb.* to
dummyuser@localhost;
Query OK, 0 rows affected (0.00 sec) 

or

mysql> grant ALL PRIVILEGES on dummydb.* to dummyuser@localhost;
Query OK, 0 rows affected (0.00 sec) 

#
# Next we set a password for this new user
#
mysql> set password for dummyuser@localhost = password('mysecretpassword');
Query OK, 0 rows affected (0.00 sec)

#
# Cleanup and ext
mysql> flush privileges;
mysql> exit;

Monday, July 25, 2011

Let me Google that for you

Tired of answering questions that people should be Google'ing themselves?  Just go to the following website and type in your query and then send them the corresponding link.

http://lmgtfy.com/

Friday, July 22, 2011

Fixing Cisco Callmanager Replication

Cisco Callmanagers consistently have random problems with replication.  Here's what works for me.
  1.  Sacrifice a chicken and egg … never know what comes first
  2.  Ssh to your primary callmanager and your secondary callmanager
  3.  Run the following:  show perf query class "Number of Replicates Created and State of Replication"
  4.  If Replication state shows 2 on both, you should be good
  5.  If Replication state shows 3 on both, you’re jacked (proceed to step 7)
  6.  If Replication state shows 0 on either, it’s initializing … don’t jack with (proceed to step 7)
  7.  For simplicity, reboot any firewalls in between ... the cause is often either a firewall or access control list blocking traffic
  8.  Wait 10 minutes and continue to run:  show perf query class "Number of Replicates Created and State of Replication"
  9.  If the status changes to 2, you’re good
  10.  If the status doesn’t change to 2, run:  utils dbreplication reset all
  11.  Wait 10 minutes and continue to run:  show perf query class "Number of Replicates Created and State of Replication"
  12.  If this still doesn’t work, I don’t know


NOTE:  Don’t reboot the callmanagers unless the Replication state shows 2

Thursday, July 14, 2011

LDAP with AD setup on Linux

REMOVE SSSD:

If you're on RHEL 6 or CentOS 6, you should first remove sssd. 

yum remove sssd
yum remove sssd-client


LINUX SETUP:


authconfig --enableldap --enableldapauth --enablelocauthorize --ldapserver=ldapserver1,ldapserver2,ldapserver3 --ldapbasedn="ou=blah,dc=example,dc=com" --update

OR

authconfig-tui


CONFIRM NSSWITCH.CONF:


/etc/nsswitch.conf:

    passwd:     files ldap
    shadow:     files ldap
    group:      files ldap


If it reads anything other than "files ldap", you did something wrong.


FINAL CONFIGURATION:

/etc/pam_ldap.conf or /etc/ldap.conf (depending on version):
   
    host ldapserver1 ldapserver2 ldapserver3
    base ou=blah,dc=example,dc=com
    binddn username@example.com  ... this is a non-privileged user ... not an admin
    bindpw type_username's_password
    timelimit 120
    bind_timelimit 120
    bind_policy soft
   

    # RFC 2307 (AD) mappings
    nss_map_objectclass posixAccount user
    nss_map_objectclass shadowAccount user
    nss_map_attribute uid sAMAccountName
    nss_map_attribute homeDirectory unixHomeDirectory
    nss_map_attribute shadowLastChange pwdLastSet
    nss_map_objectclass posixGroup group
    nss_map_attribute uniqueMember member
    pam_login_attribute sAMAccountName
    pam_filter objectclass=User
    pam_password md5


Comment out the lines below in the file:

    uri ldap://ldapserver1/ ldap://ldapserver2/ ldap://ldapserver3/ (not needed)
    ssl no (not needed)
    tls_cacertdir /etc/openldap/cacerts (not needed)


Final note, others have edited the file /etc/sysconfig/authconfig and modified the FORCELEGACY to yes, but I didn't need to.

Tuesday, June 28, 2011

Apache create wildcard cert and convert to Windows

A good conversion site is:  https://www.sslshopper.com/ssl-converter.html


Make the Apache cert:

  1.  cd /etc/httpd/conf/ssl/
  2. openssl genrsa -out wildcard.com.key 2048
    1. This generates a 2048-bit key with no password
  3. openssl req -new -key wildcard.com.key -out wildcard.com.csr
    1. Make sure your Common Name is:  *.wildcard.com
    2. Don't put a password in the extra attributes
  4. Buy the wildcard cert from a Certificate authority and use the contents of the wildcard.com.csr file to get your cert ... make sure it shows *.wildcard.com before you buy
  5. The Certificate authority will provide a zip file with the wildcard.com.crt and any intermediate certs (gd_bundle.crt)

Create the PEM file:

  1. cat wildcard.com.key > wildcard.com.bundle.pem
  2. cat wildcard.com.crt >> wildcard.com.bundle.pem
  3. cat gd_bundle.crt >> wildcard.com.bundle.pem
  4. You now have a .pem file by the name of wildcard.com.bundle.pem

Create a Windows usable certificate:

  1. openssl pkcs12 -export -in wildcard.com.bundle.pem -out wildcard com.bundle.p12 -name *.wildcard.com
  2. NOTE:  make sure not to put an export password
  3. You now have a wildcard.com.bundle.p12 file

Import certificate into Windows:

  1. Login to Windows as an Administrator
  2. At the run prompt, type:  mmc
  3. File --> Add/remove add-ins
  4. Choose Certificates --> Local computer
  5. Go to the Personal --> Certificates directory
  6. Right click the Certificates directory and choose import
  7. Import the wildcard.com.bundle.p12 file (you'll need to modify the selection to see it)
  8. Mark the Certificate as Exportable
  9. Use Extended Attributes IF asked
  10. Once the import is complete, you can now go to your individual IIS sites and use the *.wildcard.com certificate

Wednesday, September 1, 2010

Apache rewrites

In the virtualhost

<VirtualHost *:80>
ServerName domain1.com
ServerAlias *.domain1.com
DocumentRoot /path_to_documentroot
ErrorDocument 404 /path_to_documentroot
ErrorDocument 403 /path_to_documentroot
RewriteEngine on
redirectMatch 301 ^/$ http://www.domain2.com     ... this one only redirects the page itself ... no subdirectories
##redirectMatch 301 ^(.*)$ http://www.domain2.com  ... this one redirects the main page and all subpages
ErrorLog logs/domain1.com_error_log
CustomLog logs/domain1.com_log common
AddType application/x-httpd-php .php .php4 .php3 .phtml .htm .html .cmh
</VirtualHost>

In .htaccess

Options +FollowSymLinks
RewriteEngine On

RewriteCond %{REQUEST_URI} ^/subdirectory1/(.*)$
RewriteRule ^(.*)  http://www.domain2.com/subdirectorynew [R=301,L]

RewriteCond %{REQUEST_URI} ^/subdirectory2/(.*)$
RewriteRule ^(.*)  http://www.domain2.com/subdirectorynew [R=301,L]

Friday, February 12, 2010

Fixing Exchange 2003 Permissions/Activesync

Part 1:

Method 2: Use Adsutil.vbs
  1. Back up your IIS Metabase. To do this, follow these steps:


    1. Start IIS Manager.
    2. Right-click Default Web Site, point to All Tasks, and then click Save Configuration to a File.

  1. Delete the virtual directories for Outlook Web Access. To do this, right-click Exadmin in the left pane of IIS Manager, and then click Delete. Click Yes when you are prompted with the question of whether you want to delete this item.

    Repeat this step for the following virtual directories:


    1. Exchange
    2. ExchWeb
    3. Microsoft-Server-ActiveSync
    4. OMA
    5. Public

  1. Quit IIS Manager.
  2. Click Start, click Run, type cmd, and then press ENTER.
  3. Change to the following folder. In this example, Drive is the hard disk drive where Windows is installed:

Drive:\inetpub\adminscripts
  1. Type adsutil, and then press ENTER.

    Important By default, CScript is not the default scripting host for Windows Server 2003. To run the adsutil command, CScript must be configured as the default scripting host. To do this, click Yes if you are prompted to register CScript as you default host for VBscript, and then click OK.

    Note If you receive a list of adsutil command options, CScript is already configured as the default scripting host for VBscript.
  2. Type adsutil delete ds2mb, and then press ENTER.

    Note To set the default scripting host to WScript, type WScript //H:WScript at the command prompt, press ENTER, and then click OK.
  3. Click Start, point to All Programs, point to Administrative Tools, and then click Services.
  4. To restart the Microsoft Exchange System Attendant service, follow these steps:


    1. Click Start, click Run, type services.msc, and then click OK.
    2. Right-click Microsoft Exchange System Attendant, and then click Restart.
    3. When you are prompted to restart the dependant Exchange Server services, click Yes.

      Note When you restart the Microsoft Exchange System Attendant service, the Microsoft Exchange Information Store service is also restarted. In this scenario, your Exchange Server users lose connectivity to their Exchange Server mailboxes.

      The virtual directories are re-created. To verify that the virtual directories are re-created, start IIS Manager, and then view the Default Web site folder.

      Important If the virtual directories are not re-created after 15 minutes, restart the computer.

  1. Reset the access permissions to Anonymous. To do this, follow these steps:


    1. Start IIS Manager, right-click ExchWeb, click Properties, and then click the Directory Security tab.
    2. Under Authentication and access control click Edit, and then verify that the Enable anonymous access check box is turned on.
    3. Click to select the Integrated Windows authentication check box, click OK, and then click Apply.
    4. If an Inheritance Overrides dialog box appears, click Select All, and then click OK.
    5. Under Authentication and access control, click Edit, and then click to clear the Integrated Windows authentication check box.
    6. Click OK two times, and then quit IIS Manager.


Use a Web browser to verify that you can connect to your Outlook Web Access server. If you are also running other mobility services, verify that you can connect to these services by using an appropriate client.

Part 2:

Add/modify a registry value to point to the exchange-oma
1. Click Start, click Run, type regedit, and then click OK.
2. Locate the following registry subkey:

HKEY_LOCAL_MACHINE\SYSTEM\CurrentControlSet\Services\MasSync\Parameters
3. On the right panel, make sure ExchangeVDir points to /exchange-oma. If the value of ExchangeVDir is ExchDAV, you should change it to /exchange-oma.

Note: the ExchangeVDir and exchange-oma are case sensitive. In the Value data box, you must enter a forward slash (/) following by exchange-oma. Click OK.
4. If there is not ExchangeVDir, you need to create it. Right-click Parameters, click to New, and then click String Value.

Type ExchangeVDir, and then press ENTER. Right-click ExchangeVDir, and then click Modify.
5. Quit Registry Editor.
6. Restart the IIS Admin service. To do this, follow these steps:
a. Click Start, click Run, type services.msc, and then click OK.
b. In the list of services, right-click IIS Admin service, and then click Restart.


Part 3:

Creating a secondary virtual directory for ActiveSync and OMA access
1. Start Internet Information Services (IIS) Manager from Administrative Tools.
2. Locate the Exchange virtual directory, for example, Web Sites\Default Web Site\Exchange
3. Right-click the Exchange folder click All Tasks, and then click Save Configuration to a File.
4. In the File name box, type a name. For example, type ExchangeVDir. Click OK.
5. Right-click the root of this Web site. Typically, this is Default Web Site. Click New, and then click Virtual Directory (from file).
6. In the Import Configuration dialog box, click Browse, locate the file that you created in step 4, click Open, and then click Read File.
7. Under Select a configuration to import , click Exchange, and then click OK.

A dialog box will appear that states that the "virtual directory already exists."
8. In the Alias box, type a name for the new virtual directory that you want Exchange ActiveSync and Outlook Mobile Access to use. In our case, it is exchange-oma. Click OK.
9. Right-click the new virtual directory. In this example, click exchange-oma. Click Properties.
10. Click the Directory Security tab.
11. Under Authentication and access control, click Edit.
12. Make sure that only the following authentication methods are enabled, and then click OK:


Integrated Windows authentication


Basic authentication

13. Under Secure communications, click Edit. Make sure that Require secure channel (SSL) is not enabled, and then click OK.
14. Click OK, and then close the IIS Manager.

Tuesday, November 10, 2009

Backup/Restore MySQL Databases

BACKUP ALL DATABASES:

#!/bin/sh
#
# SCRIPT TO DUMP ALL THE DATABASES
#
PATH=/usr/local/bin:/bin:/sbin:/usr/bin:/usr/sbin:/usr/local/lib:/etc
export PATH

/usr/bin/mysqldump -u root --password=<your mysql root password> --all-databases | gzip > /root/mysqlbackup/databasebackup.sql.gz

RESTORE ALL DATABASES:

/usr/bin/mysql -u root -p < databasebackup.sql.gz

enter your root password when prompted

Saturday, April 18, 2009

Rsync, scp, and ssh without passwords

A great writeup about this is here.
Whenever you need to use scp to copy files, it asks for passwords. Same with rsync as it (by default) uses ssh as well. Usually scp and rsync commands are used to transfer or backup files between known hosts or by the same user on both the hosts. It can get really annoying the password is asked every time. I even had the idea of writing an expect script to provide the password. Of course, I didn’t. Instead I browsed for a solution and found it after quite some time. There are already a couple of links out there which talk about it. I am adding to it…

Lets say you want to copy between two hosts host_src and host_dest. host_src is the host where you would run the scp, ssh or rsync command, irrespective of the direction of the file copy!

1. On host_src, run this command as the user that runs scp/ssh/rsync

$ ssh-keygen -t rsa

This will prompt for a passphrase. Just press the enter key. It’ll then generate an identification (private key) and a public key. Do not ever share the private key with anyone! ssh-keygen shows where it saved the public key. This is by default ~/.ssh/id_rsa.pub:

Your public key has been saved in <your_home_dir>/.ssh/id_rsa.pub

2. Transfer the id_rsa.pub file to host_dest by either ftp, scp, rsync or any other method.

3. On host_dest, login as the remote user which you plan to use when you run scp, ssh or rsync on host_src.

4. Copy the contents of id_rsa.pub to ~/.ssh/authorized_keys

$ cat id_rsa.pub >>~/.ssh/authorized_keys
$ chmod 700 ~/.ssh/authorized_keys

5. If this file does not exists, then the above command will create it. Make sure you remove permission for others to read this file. If its a public key, why prevent others from reading this file? Probably, the owner of the key has distributed it to a few trusted users and has not placed any additional security measures to check if its really a trusted user. Note that ssh by default does not allow root to log in. This has to be explicitly enabled on host_dest. This can be done by editing /etc/ssh/sshd_config and changing the option of PermitRootLogin from no to yes. Don’t forget to restart sshd so that it reads the modified config file. Do this only if you want to use the root login.  Please note, there seems to be an exception to this addition if your system uses PAM for authentication, so test.

Well, thats it. Now you can run scp, ssh and rsync on host_src connecting to host_dest and it won’t prompt for the password. Note that this will still prompt for the password if you are running the commands on host_dest connecting to host_src. You can reverse the steps above (generate the public key on host_dest and copy it to host_src) and you have a two way setup ready!

Friday, April 10, 2009

Removing SSL Vulnerabilities on Webservers

A great website for reference is here.

IIS CONFIG

Create a sslvulnerabilityremoval.reg file with the following and merge it onto the Windows Server (2003 in my case) and reboot.

Windows Registry Editor Version 5.00

[HKEY_LOCAL_MACHINE\SYSTEM\CurrentControlSet\Control\SecurityProviders\SCHANNEL\Protocols\PCT 1.0\Server]
"Enabled"=dword:00000000

[HKEY_LOCAL_MACHINE\SYSTEM\CurrentControlSet\Control\SecurityProviders\SCHANNEL\Protocols\SSL 2.0\Server]
"Enabled"=dword:00000000

[HKEY_LOCAL_MACHINE\SYSTEM\CurrentControlSet\Control\SecurityProviders\SCHANNEL\Ciphers\DES 56/56]
"Enabled"=dword:00000000

[HKEY_LOCAL_MACHINE\SYSTEM\CurrentControlSet\Control\SecurityProviders\SCHANNEL\Ciphers\NULL]
"Enabled"=dword:00000000

[HKEY_LOCAL_MACHINE\SYSTEM\CurrentControlSet\Control\SecurityProviders\SCHANNEL\Ciphers\RC2 40/128]
"Enabled"=dword:00000000

[HKEY_LOCAL_MACHINE\SYSTEM\CurrentControlSet\Control\SecurityProviders\SCHANNEL\Ciphers\RC2 56/128]
"Enabled"=dword:00000000

[HKEY_LOCAL_MACHINE\SYSTEM\CurrentControlSet\Control\SecurityProviders\SCHANNEL\Ciphers\RC4 40/128]
"Enabled"=dword:00000000

[HKEY_LOCAL_MACHINE\SYSTEM\CurrentControlSet\Control\SecurityProviders\SCHANNEL\Ciphers\RC4 56/128]
"Enabled"=dword:00000000

[HKEY_LOCAL_MACHINE\SYSTEM\CurrentControlSet\Control\SecurityProviders\SCHANNEL\Ciphers\RC4 64/128]
"Enabled"=dword:0000000

APACHE CONFIG

Here's a basic setup in the httpd.conf file for Apache

<VirtualHost *:443>
ServerName whatever.yourdomain.com
DocumentRoot "/export/web/html"
ErrorLog logs/whatever.yourdomain.com_error_log
CustomLog logs/whatever.yourdomain.com_access_log common

<Directory "/export/web/html">
Options FollowSymlinks
AllowOverride None
Order allow,deny
Allow from all
</Directory>

SSLEngine on

SSLProtocol -ALL +SSLv3 +TLSv1
SSLCipherSuite ALL:!aNULL:!ADH:!eNULL:!LOW:!EXP:RC4+RSA:+HIGH:+MEDIUM

SSLCertificateFile /etc/httpd/conf/ssl/whatever.yourdomain.com.crt
SSLCertificateKeyFile /etc/httpd/conf/ssl/whatever.yourdomain.com.key
SSLCertificateChainFile /etc/httpd/conf/ssl/intermediate.crt

RewriteEngine On
RewriteCond %{REQUEST_METHOD} ^TRACE
RewriteRule .* - [F]

</VirtualHost>

TESTING

You should receive an error on each of these tests.  If you receive a lot of information, you're vulnerable.

Testing for SSLv2 vulnerabilities

# openssl s_client -ssl2 -connect SERVERNAME:443

Testing for weak ciphers

# openssl s_client -connect SERVERNAME:443 -cipher LOW:EXP

Tuesday, March 17, 2009

Apache 2.2 SSL Setup including redirect

Usually done in /etc/httpd/conf.d/ssl.conf

I comment out the virtual host in the above file and add the relevant data to my file.

NameVirtualHost 192.168.1.1:80
NameVirtualHost 192.168.1.1:443

<VirtualHost 192.168.1.1:80>
ServerName whatever.yoursite.com
DocumentRoot "/export/web/html"
ErrorLog logs/whatever.yoursite.com_error_log
CustomLog logs/whatever.yoursite.com_access_log common

Redirect / https://whatever.yoursite.com/

</VirtualHost>

<VirtualHost 192.168.1.1:443>
ServerName whatever.yoursite.com
DocumentRoot "/export/web/html"
ErrorLog logs/whatever.yoursite.com_error_log
CustomLog logs/whatever.yoursite.com_access_log common
##LogLevel debug
<Directory "/export/web/html">
Options FollowSymlinks
AllowOverride None
Order allow,deny
Allow from all
AuthName "LDAP Authorization"
AuthType Basic

### The next 2 lines are required in Apache 2.2
AuthBasicProvider ldap
AuthzLDAPAuthoritative off

AuthLDAPBindDN "ldapuser@ad_domain"
AuthLDAPBindPassword "password"
AuthLDAPURL "ldap://AD_Domain_Controller/ou=Users,dc=yoursite,dc=com?sAMAccountName?sub"

### Either use valid-user or ldap-user
#require valid-user
require ldap-user user1 user2 user3 user4
require ldap-user user5 user6 user7 user8

satisfy all
</Directory>
SSLEngine on
SSLProtocol all -SSLv2
SSLCipherSuite ALL:!ADH:!EXPORT:!SSLv2:RC4+RSA:+HIGH:+MEDIUM

SSLCertificateFile /etc/httpd/conf/ssl/yoursite.com.crt
SSLCertificateKeyFile /etc/httpd/conf/ssl/yoursite.com.key
SSLCertificateChainFile /etc/httpd/conf/ssl/bundle.crt

RewriteEngine On
RewriteCond %{REQUEST_METHOD} ^TRACE
RewriteRule .* - [F]

</VirtualHost>

Apache 2.2 ldap setup

NameVirtualHost 192.168.x.x:80

<VirtualHost 192.168.x.x:80>
ServerName whatever.yoursite.com
DocumentRoot "/export/web/html"
ErrorLog logs/whatever.yoursite.com_error_log
CustomLog logs/whatever.yoursite.com_access_log common
##LogLevel debug

<Directory "/export/web/html">Options FollowSymlinks
AllowOverride None
Order allow,deny
Allow from all
AuthName "LDAP Authorization"
AuthType Basic

### The next 2 lines are required in Apache 2.2
AuthBasicProvider ldap
AuthzLDAPAuthoritative off

AuthLDAPBindDN "ldapusername@yourad"
AuthLDAPBindPassword "password"
AuthLDAPURL "ldap://fqdn_of_your_AD_server/ou=Users,dc=yoursite,dc=com?sAMAccountName?sub"

### Either use valid-user or ldap-user
#require valid-user
require ldap-user user1 user2 user3 user4
require ldap-user user5 user6 user7 user8

satisfy all

</Directory>
</VirtualHost>

Wednesday, February 11, 2009

Sonicwall Hidden Administration Page

http(s)://hostname/Diag.html